When building search-driven experiences in Sitecore Search (XM Cloud), it’s common to personalize or adjust results based on business logic. That’s where widget rules come into play.
In this post, we’ll cover:
What rules are in Sitecore Search
The different types of rules (Boost, Bury, Blacklist)
How these rules interact when applied in a widget variation
What are Widget Rules?
Rules in Sitecore Search let you shape search results without touching the underlying index. Instead of relying solely on relevance scoring, you can configure rules to:
Pin certain items so they always show up
Push specific items higher in results
Push unwanted items lower
Exclude items completely
These rules can be applied directly to a widget variation, or globally so they’re inherited across multiple variations.
Slots
Slots are fixed positions in your search results where you can pin specific content or products.
You can drag and drop items into slots from the content collection.
Once placed, you can still apply rules like Boost, Bury, or Blacklist to fine-tune behavior.
Slots are especially useful for promoting key campaigns, “hero” products, or editorial content.
Types of Rules
1. Boost Rules
Boosting pushes certain items higher in the results.
You define attributes (e.g., brand, price, color, category, feature) as conditions.
Example: Boost all items where color = "Red".
Multiple attributes act as an OR condition (if any match, the item gets boosted).
Use case: Highlight products from a specific brand during a seasonal campaign.
2. Bury Rules
Burying does the opposite — it pushes items lower in the results.
Works the same way as boost, by selecting attributes.
When the variation is active, buried items appear after all other results, ranked only among themselves.
Use case: Push out-of-season products toward the bottom of the results list.
3. Blacklist Rules
Blacklist rules completely exclude items from search results.
Once an item matches a blacklist condition, it won’t appear at all.
Use case: Hide discontinued products or content flagged as internal only.
If you set all three types of rules — boost, bury, and blacklist — for a variation in Sitecore’s “Widget Variation → Rules” setup, here’s what happens, based on the “Rule ranking and consolidation” behaviour in Search.
Each widget variation inherits two sets of rules:
the rules defined in that particular widget variation
the rules from the active global widget variation
What happens if you have boost + bury + blacklist rules
Given you have three different rules in a variation or combination (including possibly from global variation) — one to boost, one to bury, one to blacklist — here’s how they’d interact:
Blacklist – Items matching this rule are excluded completely; they won’t show up in the results.
Bury – items matching this rule are de-prioritized / pushed down. They still appear, but lower in ranking.
Boost – Items matching this rule are elevated / pushed up in ranking.
So, if you supply all three rules, Sitecore will:
Exclude items that match the blacklist rule.
For the rest, among items that survive the blacklist filter: • boost some per the boost rule, • bury some per the bury rule, • the relative effect of boost or bury depends on which rule has the higher (i.e. lower number) rank.
That all-too-familiar server error shows up and suddenly your site feels broken. The user sees a generic, ugly message — not the best experience, right?
But what if we could handle server errors gracefully, even in a multisite Sitecore JSS + Next.js environment?
This guide walks you through how to build a proper 500 error page setup that works across multiple sites and hosts — using Sitecore JSS, Next.js, and a touch of smart engineering.
🤔 Why Custom 500 Handling Matters
In large-scale multisite projects, an unhandled 500 means:
A broken user experience
Lost trust and engagement
Confusion about whether the site is down completely
Handling server errors gracefully isn’t just good UX — it’s also good for observability, debugging, and future-proofing your app.
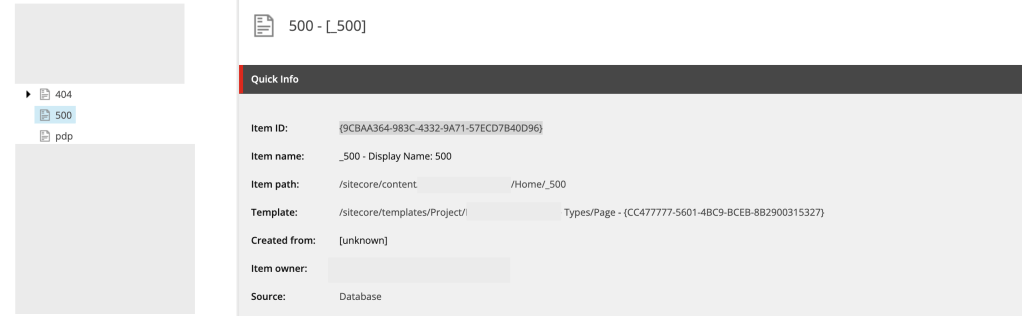
Step 1: Create a 500 Page in Sitecore
Let’s start by creating a dedicated 500 error page within Sitecore Content Editor.
❗ Note: Sitecore JSS does not allow numeric-only routes like /500. Use a name like _500 instead.
Create a page under your site’s content tree (e.g., /site/pages/_500)
Set the Display Name to “500” (you can set as per the requirement or more content author friendly)
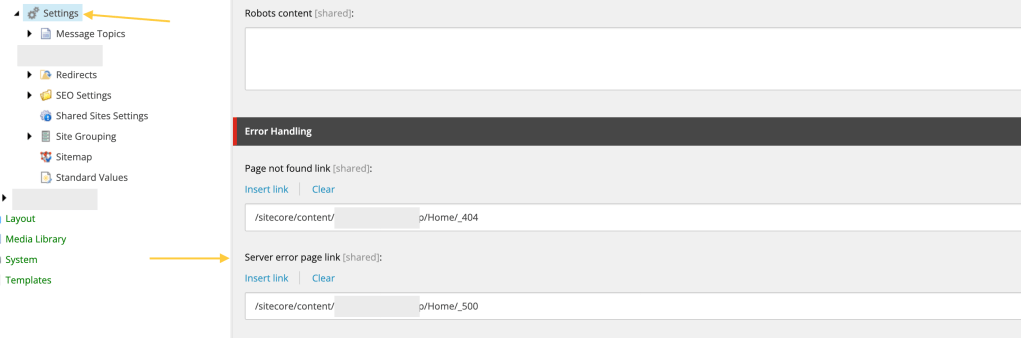
Step 2: Assign the 500 Page in Site Settings
Now that your 500 page exists, link it to the site’s error handling settings:
Go to your Site Settings item in the content tree
Scroll to the Error Handling section
In the Server Error Page field, select the _500 page you created
This is the basic setup for error handling from Sitecore side now it’s time to jump on Next Js for further configuration.
Step 3: Handle Multisite Layout Data via API Route
In a multisite environment, we can’t rely on getStaticProps or hardcoded paths. We need to dynamically resolve the layout data for each site’s 500 page based on the domain.
To solve this, create a custom API route to serve 500 page data per site:
pages/api/error/content.ts
content.ts
import {
  ComponentPropsService,
  GraphQLErrorPagesService,
  LayoutServiceData,
} from '@sitecore-jss/sitecore-jss-nextjs';
import { siteResolver } from 'lib/site-resolver';
import { NextApiRequest, NextApiResponse } from 'next';
import config from 'temp/config';

import clientFactory from 'lib/graphql-client-factory';
import { moduleFactory } from 'temp/componentBuilder';
import { sitecorePagePropsFactory } from 'lib/page-props-factory';

/**
 * Gets the ErrorPages content.  We have to fetch via API to be able to get site-specific content.
 */
export default async function handler(req: NextApiRequest, res: NextApiResponse) {
  const domain = req.headers.host;
  let siteName;
  const context = {
    defaultLocale: 'en',
    locale: 'en',
    locales: ['en'],
  };
  // If no store id in cookie, let it grab default in page props factory

  // const rewritePath = getStoreIdRewritePath(, { storeId });
  try {
    const site = siteResolver.getByHost(domain ?? '');
    siteName = site.name;
  } catch {
    siteName = config.sitecoreSiteName;
  }


  const serverErrorData = await sitecorePagePropsFactory.create({
    params: {
      path: [`_site_${siteName}`, '_500'],
    },
    locale: context?.locale,
  });

  try {
    const resultErrorPages = await errorPagesService.fetchErrorPages();

    const layoutService = await new ComponentPropsService().fetchStaticComponentProps({
      context: context,
      layoutData: resultErrorPages?.notFoundPage?.rendered as LayoutServiceData,
      moduleFactory: moduleFactory,
    });

    res.setHeader('CDN-Cache-Control', `s-maxage=60, stale-while-revalidate=${60 * 60}`);

    // Cache settings for the browser.
    res.setHeader('Cache-Control', `max-age=60, stale-while-revalidate=${60 * 60}`);

    res.status(200).json({
      ...props,
      componentProps: layoutService,
      serverErrorData: serverErrorData,
    });
  } catch (error) {
    console.error('Error occurred while fetching error pages');
    console.error(error);
    res.status(500).json({ message: 'An error occured' });
  }
}
What’s Happening?
Domain-based site detection via a siteResolver
Dynamically resolves the 500 error page path per site
Fetches layout data and component props needed for rendering
Adds smart caching headers for better performance
Now call this API from 500 page.
Step 4: Create 500.tsx in Next.js App
Next, create a custom 500 error page that uses the API route we just built.
pages/500.tsx
import Head from 'next/head';
import Layout from 'src/Layout';
import { componentBuilder } from 'temp/componentBuilder';
import { useEffect, useState } from 'react';
import { SiteName } from 'src/helpers/Constants';
import { sitecorePagePropsFactory } from 'lib/page-props-factory';
import { SitecorePageProps } from 'lib/page-props';
import {
  ComponentPropsContext,
  ErrorPages,
  LayoutServiceData,
  SitecoreContext,
} from '@sitecore-jss/sitecore-jss-nextjs';
import { ComponentProps } from '@sitecore-feaas/clientside/types/headless';

const ServerError = (): JSX.Element => (
  <>
    <Head>
      <title>500: Server Error</title>
    </Head>
    <div style={{ padding: 10 }}>
      <h1>500 Internal Server Error</h1>
      <p>There is a problem with the resource you are looking for, and it cannot be displayed.</p>
      <a aria-label="Go to the Home page" href="/">
        Go to the Home page
      </a>
    </div>
  </>
);

const Custom500: React.FC<SitecorePageProps> = () => {
  const [layoutData, setLayoutData] = useState<LayoutServiceData>();
  const [componentProps, setComponentProps] = useState<ComponentProps>();
  const [fetchError, setFetchError] = useState(false);
  const [componentContextData, setcomponentContextData] = useState<ComponentContextData>({});


  useEffect(() => {
    // Only execute if we didn't get data from the default.
    // Depending on requirements, we may want to always fetch.
    if (!layoutData) {
      fetch('/api/error/content')
        .then(async (res) => {
          // eslint-disable-next-line @typescript-eslint/no-explicit-any
          const data = (await res.json()) as ErrorPages | null;
          // eslint-disable-next-line @typescript-eslint/no-explicit-any
          if ((data as any)?.layoutData) {
            // eslint-disable-next-line @typescript-eslint/no-explicit-any
            setComponentProps((data as any)?.componentProps);
            // eslint-disable-next-line @typescript-eslint/no-explicit-any
            setLayoutData((data as any)?.serverErrorData?.layoutData);
            window.history.replaceState(null, '', '/500');
          } else {
            // There was no custom error page, render the fallback.
            setFetchError(true);
          }
        })
        .catch(() => {
          // There was an error, render the fallback.
          setFetchError(true);
        });
    }
  }, []);

  if (fetchError) {
    return <ServerError />;
  }

  if (!layoutData || !componentProps) {
    return <></>;
  }

  return (
    <ComponentPropsContext value={componentProps}>
      <SitecoreContext
        componentFactory={componentBuilder.getComponentFactory()}
        layoutData={layoutData}
      >
        <Layout layoutData={layoutData} headLinks={[]} />
      </SitecoreContext>
    </ComponentPropsContext>
  );
};
What’s Going On Here?
The component fetches the 500 page layout dynamically from our API route
It renders your Sitecore-managed 500 content — with all the branding, components, and context you expect
If the API fails or data is missing, it gracefully falls back to a hardcoded static message
Tips
Cache Strategically: Set CDN and browser cache headers for the error API route to reduce load under high-traffic conditions.
Localization Support: Add locale detection and translation support in both API and client-side rendering.
Telemetry: Log 500 page hits to Application Insights, Sentry, or another observability tool for better incident tracking.
Fallback Component: Keep a styled and branded fallback error component for when even your error page fails.
If you found this helpful, let me know or feel free to share your own approach! Happy coding 👨💻👩💻
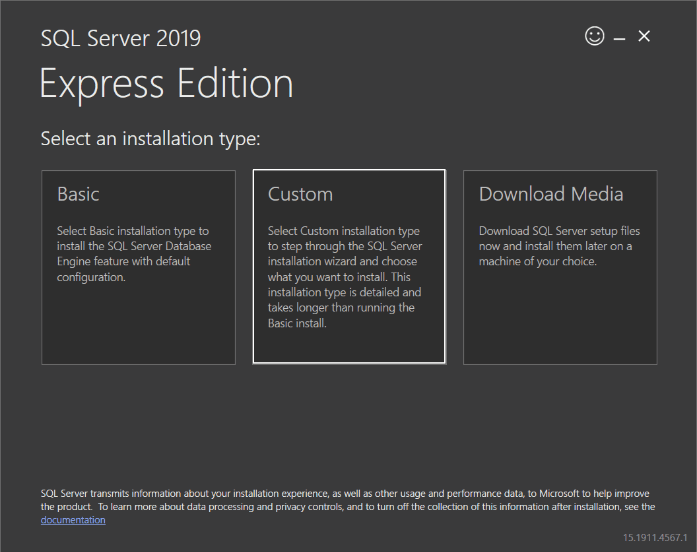
During the installation, select the Custom installation option. Set the path for the setup files and proceed with the installation.
We willl set the path of the setup files to be downloaded and then click the install button:
The downloading process will be started.
Now, we will select the New SQL Server stand-alone installation or add features to an existing installation option to start the installation:
Accept the license terms
The Global Rules screen will be launched and, the SQL Server Setup will be checked the computer configurations:
The Product Update screen checks the latest updates of the SQL Server Setup
In the Install Rules screen click the Next button.
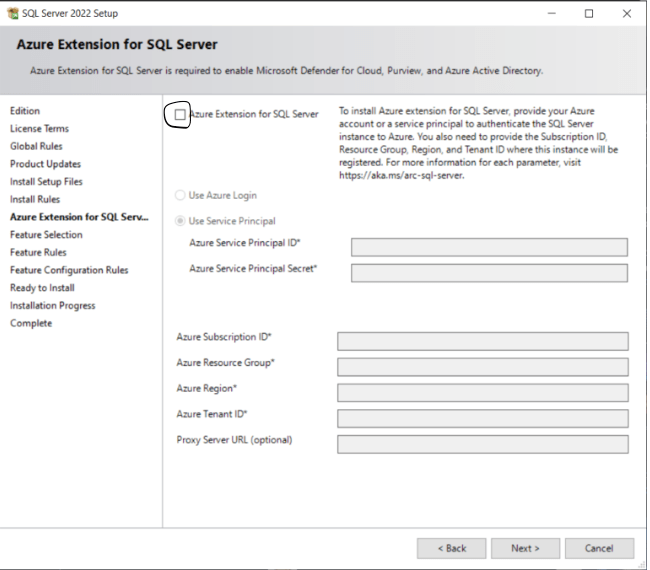
A new page is the Azure Extension for SQL Server, Uncheck on Azure Extension for SQL Server check box if it is checked :
In the Feature Selection screen select the following Features:
Database Engine Services
SQL Server Replication
Or you can chek all if needed.
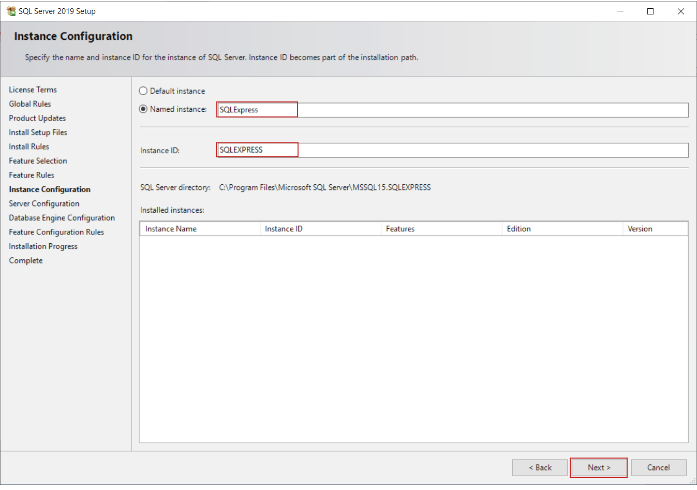
In the Instance Configuration screen, we will give a name to the SQL instance but we will not change the default name of the installation. Click the Next button:
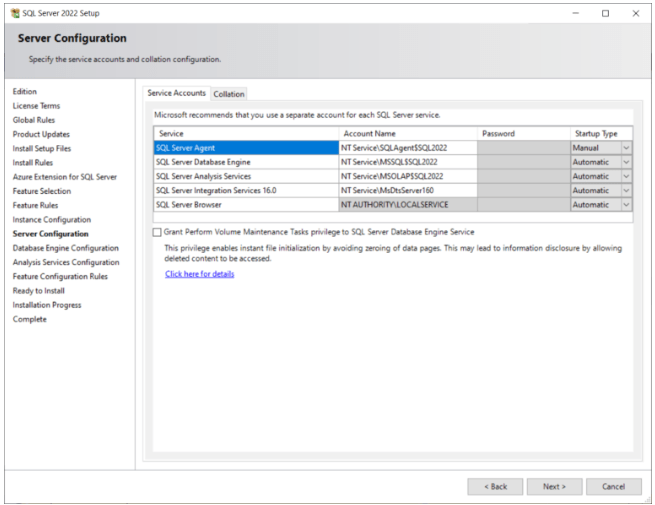
Then you can configure the service account. Typically I leave everything as the default.
In the Database Engine Configuration screen select the Mixed Mode and provide the password (store the password for future requirement.) which we will us in SQL server management studio to login sa user. And click the Next button.
We’re almost done. We get a final overview and then we can click on the Install button.
Grab a Tea or Coffee of your choice and wait till the installation finishes.
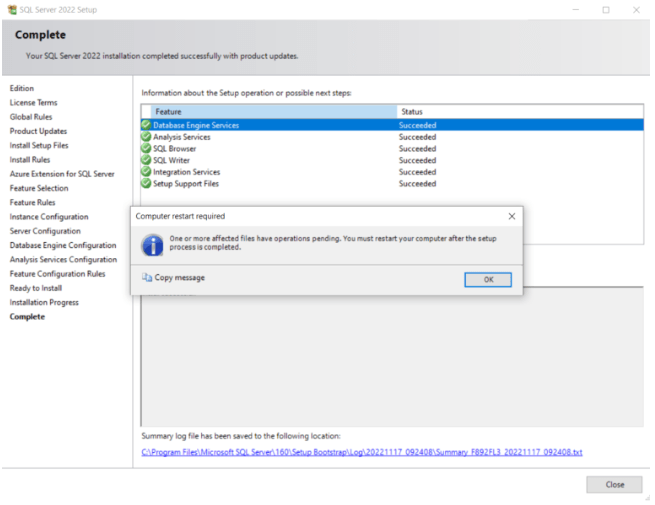
After some time, the setup (hopefully) finishes successfully. You might get the pop-up window for restart your PC.
Install SQL Server Management Studio 2019
Download and install the SQL Server Management Studio 2019 from the below link:
Once you install and enable the sa user check with it login credentials.
Download Sitecore 10.3 xp
In below link you will find the Setup of Sitecore 10.3xp as well lincence file and all the other setup which are requires to install Sitecore in your machine.
Unzip the sitecore 10.3 package.
Double-click on the Sitecore setup you will see the below screen.
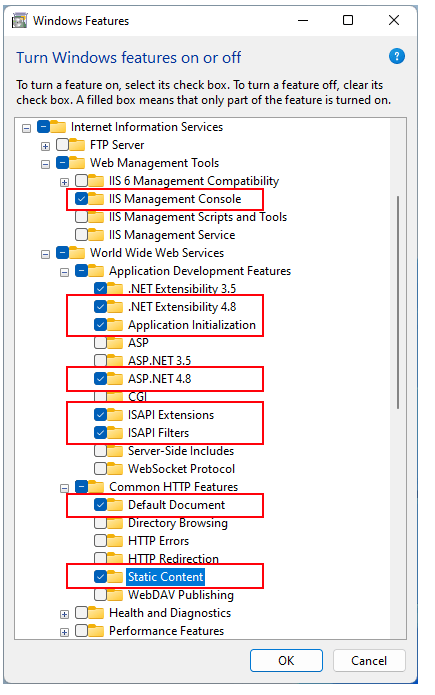
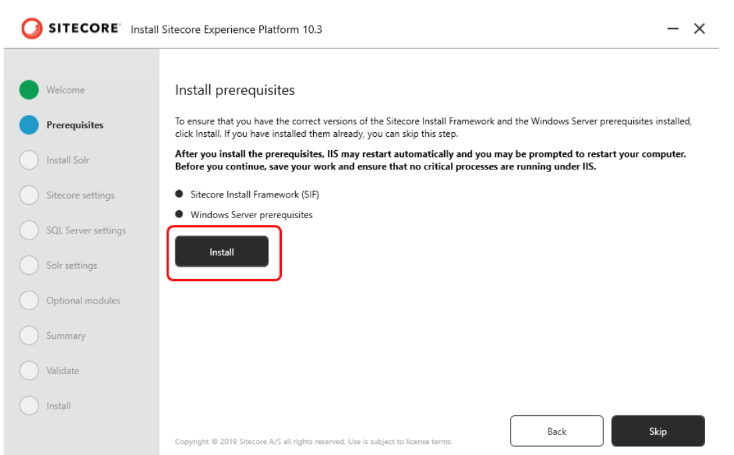
On Prerequisite screen click on Install button. This will install various components, such as .Net Framework 4.8.0, essential Windows Server prerequisites including IIS, as well as other required modules.
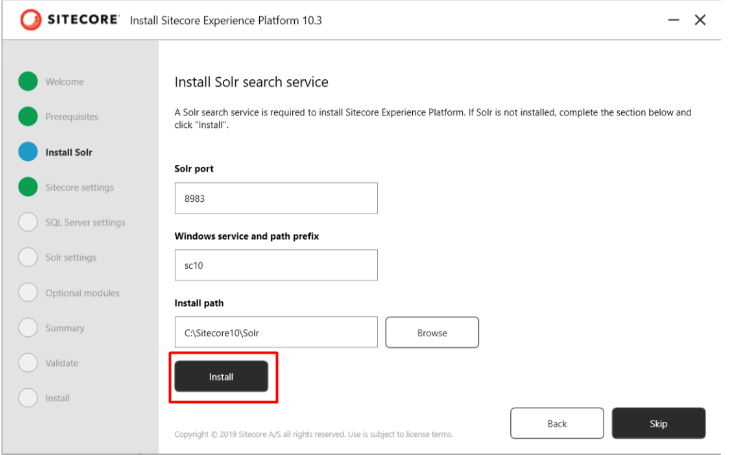
Solrsearch service and then proceed by clicking the Install button. This action will initiate the installation of Solr version 8.11.2 on your system.
Solr Port: 8983 (Ensure the port is available and not in use)
Windows Service and Path Prefix: You can choose your preferred prefix
Installation Path: Default is C:\Solr (You can browse your preferred path)
Once the Solr search service successfully installed click on Next .
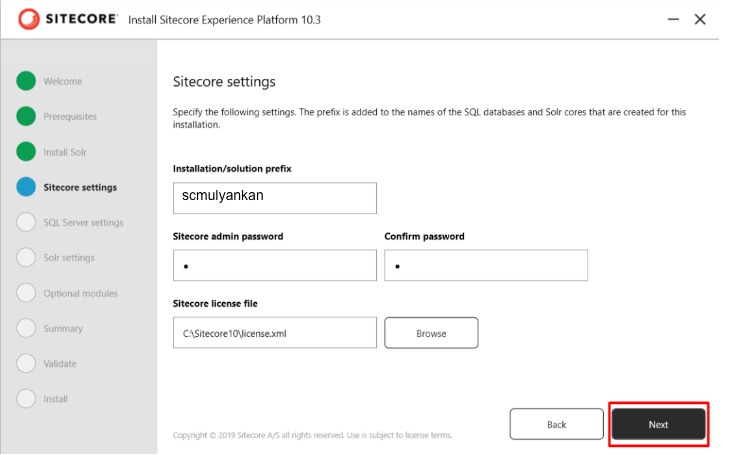
Input the Sitecore configurations and then proceed by selecting the Next .
Installation Prefix: Name of the Sitecore instance
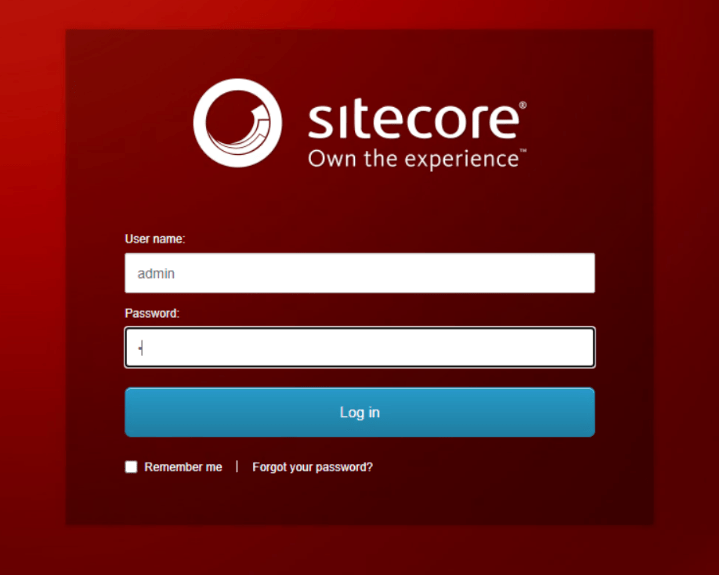
Sitecore Admin Password: Use ‘b‘ 😄 or as your preferance.
Sitecore License File: Choose the license file which is already in the setup folder
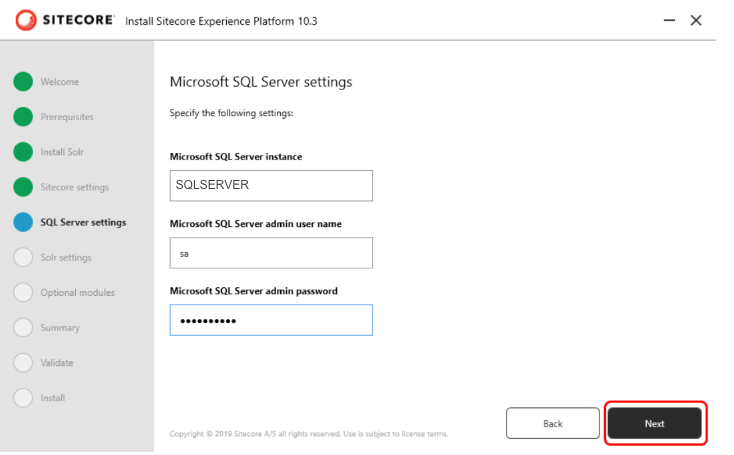
Input the SQL server details and proceed by clicking Next.
SQL Server Name: SQLSERVER or whatever your SQL server name is.
Microsoft SQL Server Admin User Name: sa
Microsoft SQL Server Admin Password: [Enter the password]
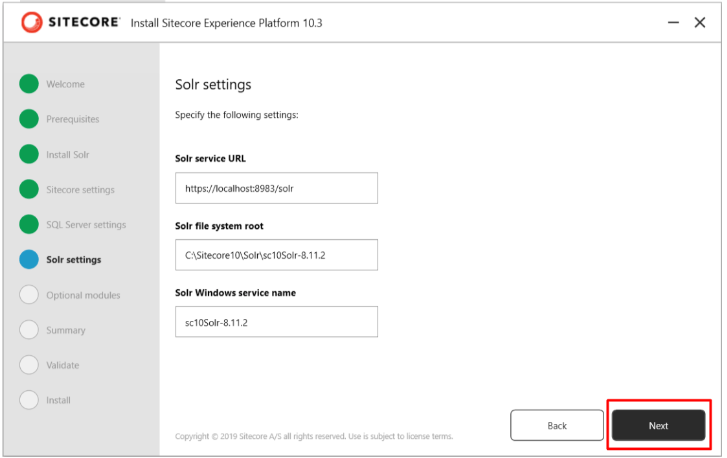
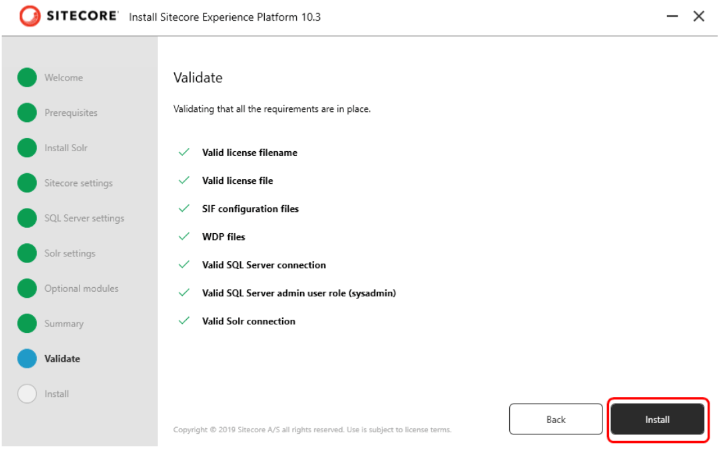
Solr details will be auto-populated. If not, enter the SOLR details and click Next.
In today’s digital landscape, personalized user experiences are no longer a luxury but a necessity. Sitecore’s search recommendation system offers a powerful way to enhance user engagement by delivering relevant content and products to your website visitors. This capability not only improves user satisfaction but can significantly impact conversion rates and average order values
This guide will walk you through the process of implementing Sitecore search recommendations on your website, from creating a recommendation widget in the Customer Engagement Console (CEC) portal to integrating it into your Next.js application. By the end, you’ll have a solid understanding of how to leverage Sitecore’s recommendation engine to create tailored experiences for your users.
1. Creating a Recommendation Widget
To begin implementing Sitecore search recommendations, you’ll first need to create a widget in the CEC portal:
Navigate to the Widget section in the CEC portal and click on Add Widget
2. Select Recommendation as the Widget Type
3. Set up the widget with the following parameters:
WIDGET NAME : Choose an appropriate name for your widget
RFK ID : Assign a unique RFK ID that will be used to render your widget
VARIATION NAME : Add your default variation (you can add more variations later based on requirements)
WILL BE USED IN : Select from one of three options (For example, choose “common across all pages” to enable the widget on all pages)
Grouping : Set to true by default, can be changed if not needed
Select a recipe based on your requirements
What is a Recipe?: A recipe determines how results are generated based on the data fed during widget rendering, using context (User or site)
You can set context using PageController.getContext().setIds
5. Review your configuration, click Save, and then publish the widget
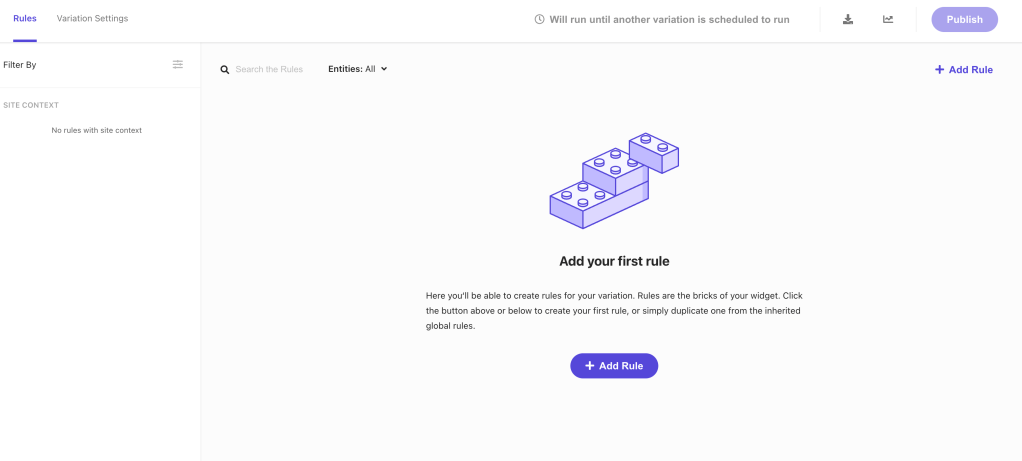
2. Customizing Widget Configuration (Optional)
After creating your widget, you may want to customize its behavior. The widget variation settings allow you to modify how recommendations are generated and displayed:
Navigate to your created widget and follow this path: Widget Variation → Default → Rules → Add Rule
In the top navigation, you’ll find options to add or modify rules (select the product as the output entity)
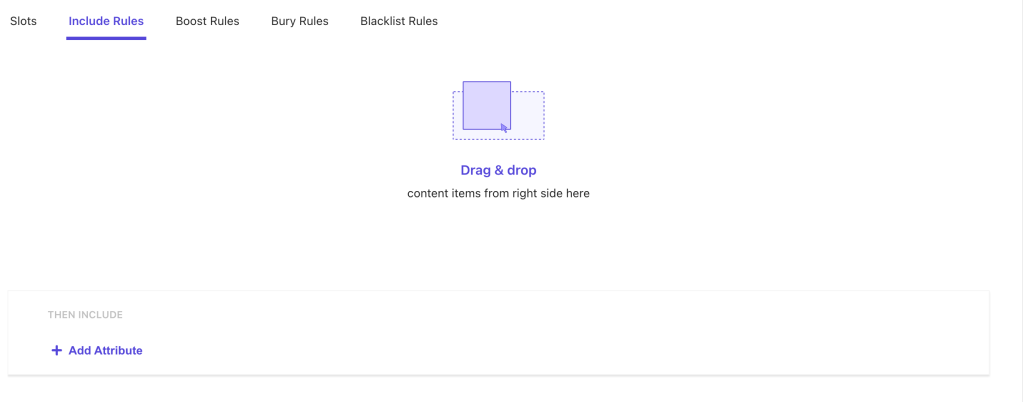
Configure the Slots section to customize specific product recommendations: There are several rule types you can implement:
There are multiple options like Include , Boost , Bury Current , Blacklist Current etc.
you can change the settings based on requirements.
Include Rules: This rule provide the facility to include some specific products based on the Include Rule attribute.
Boost Rules: You might want to present certain products before others in case of excess inventory or a promotion.
Bury Rules: To force products to the bottom of the results, you can bury them.
Blacklist Rules: To skip certain products in the results, you can blacklist them.
After adding the rule click on save and then publish the widget.
This is the highlight of the CEC portal configuration. let’s see how you can use it from application side.
3. Next.js Integration
Once your widget is configured in the CEC portal, you’ll need to integrate it into your Next.js application:
Create a new component called RecommendationProducts (or another name of your choice)
Implement the component using the following code structure:
you need use useRecommendation for the Recommendation. also can add some initial configuration as i set the itemsPerPage state for maximum result limit.
import RecommendedProductWidget from 'src/helpers/ProductRecommendation';

return (
      <RecommendedProductWidget
        rfkId={'rfk_RecPDP1'} //provide the rfk_id that you have created in CEC portal
      />
  );
};
Conclusion
This is how the basic steps to create and render your Recommendation widget, you can add more variation as well and add different rules for it and can make them as default variation as well. Other thing is you can also render this component using the Sitecore side and can provide the configuration inside the component datasource for content authorable.
You can create multiple variations of your widgets, implement different rules for different scenarios, and even render components directly from Sitecore with content author configurations. This versatility allows you to continually refine your recommendation strategy based on user behavior and business objectives.
As you become more familiar with the system, consider experimenting with different recipes and rules to find the optimal recommendation strategy for your specific use case. Monitor performance metrics closely and iterate on your approach to maximize the impact of personalized recommendations on your digital experience.
By leveraging Sitecore search recommendations effectively, you’re not just improving your site’s functionality—you’re creating more meaningful, personalized interactions that can significantly enhance customer satisfaction and drive business results.
Range facets are powerful tools for filtering numerical data like prices, dates, or quantities in your search interface. This guide walks through implementing a range facet in Sitecore Search and integrating it with a Next.js application.
Part 1: Configuring Range Facets in Sitecore Search
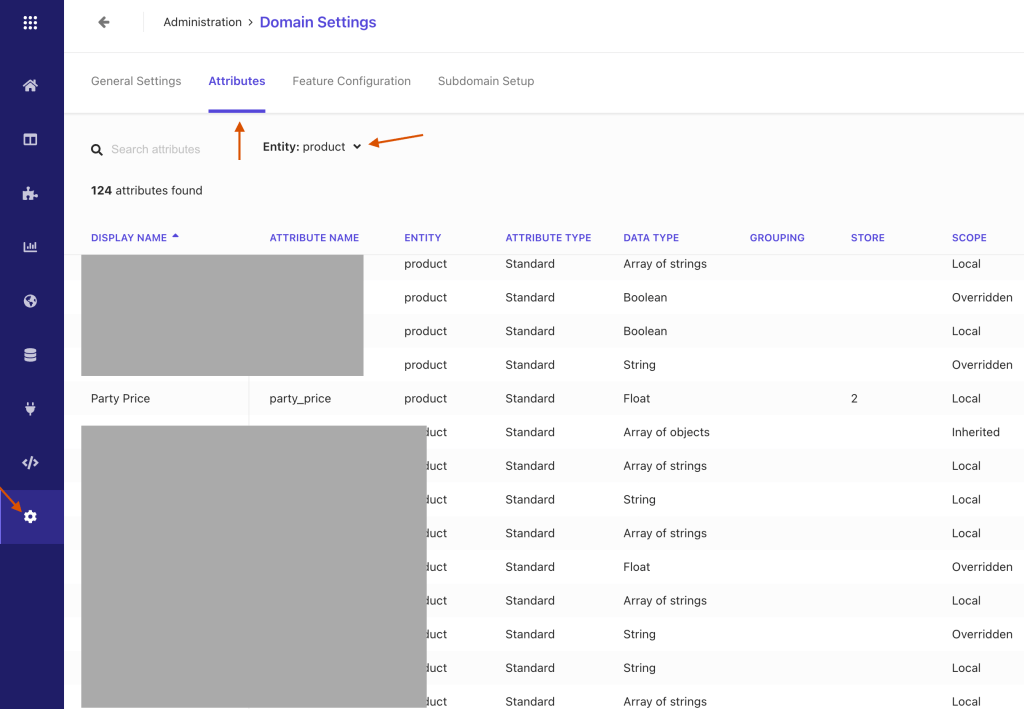
In first step , we will create a “range”facet in Sitecore Search, In my dataset I have party_price attribute field, which is already configured within Sitecore Search. These attributes are readily accessible through the Domain Settings,
which you can find from Administration → Domain Settings → Attributes
Then you need to select a product entity or All from Entity dropdown
Click on party_price field
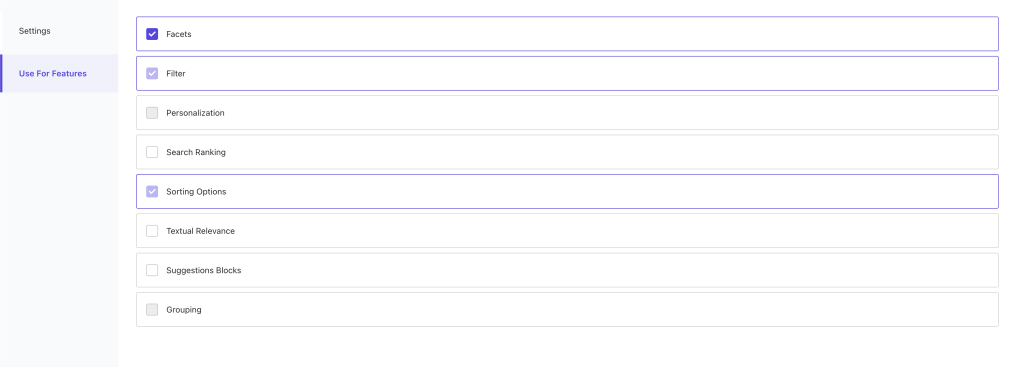
you will find some configuration inside it
To use this field as facet, navigate to the Use For Features and check the Facet checkbox
Save the changes and publish it. (Most forgettable 😄)
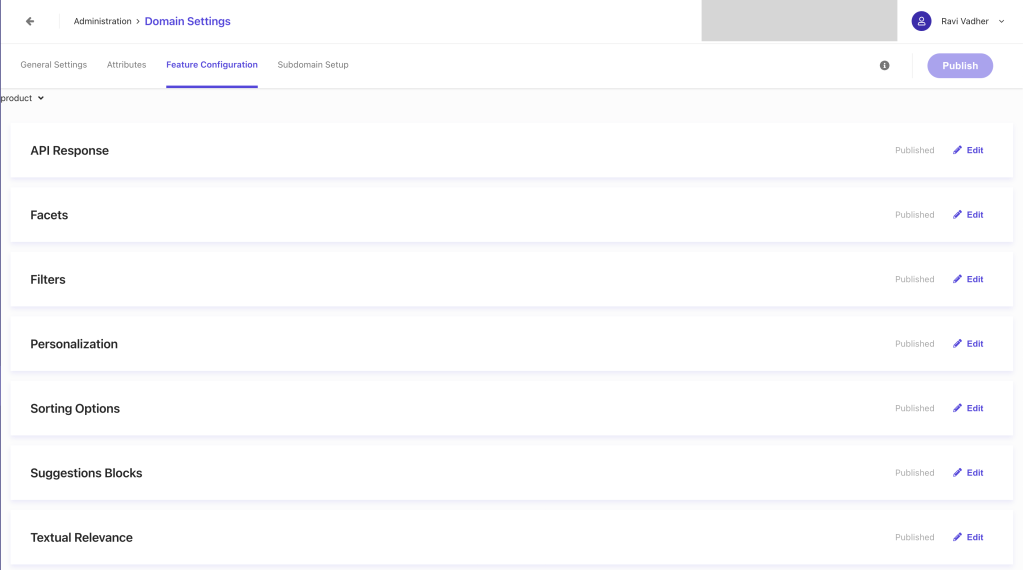
Now, our next step is to configuring our Facet , so for that we will again navigate to Domain settings and then click on the Feature Configuration
You can see list features like, API Response, Facets, Filters, Personalization etc. As we want to configure the Facet will navigate to the Facet feature.
From the facet list you can find the newly created facet in my case It will be party_price
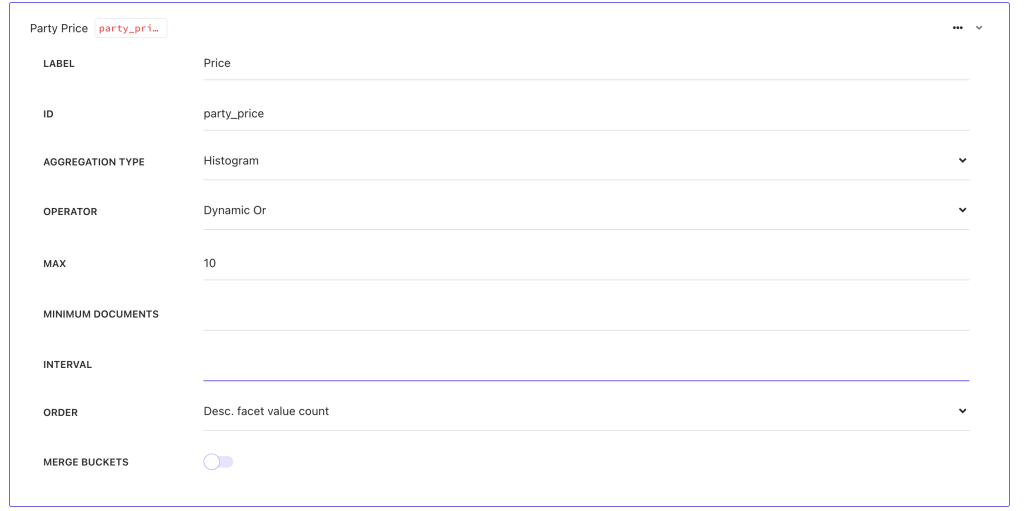
click on the party_price facet for configuration.
Ensure that:
AGGREGATION TYPE is set to Histogram.
OPERATOR is set to Dynamic OR.
Save and publish the changes.
I’m skipping the Sitecore Configuration part as this is all about the “Range” facet. (I’ll cover in Facet configuration part).
This is all from Siirecore Search facet configuration. Now we’ll jump into Next js configuration part.
Part 2: Implementing Range Facets in Next.js
Configure Search Results Widget:
To setup the range filter first of all you need to pass the config while calling the useSearchResults widget.
in above code snippet you can see I have configured the party_price as type of range. If you are not configure the specific type it would behave differently !
Create the Range Facet Component:
Now we will create the Price Facet Component where we will implement our facet things.
As of now i’m compering with the static value, but there is also an other way to do this.
Build a Custom Range Label:
Here some more things to keep in your note that we also have to create separate label for the range it will not work like other facet.
for that you can export the function and can reuse it.
export const buildRangeLabel = (min: number | undefined, max: number | undefined): string => {
// Constructs the label string for the range (e.g., "$10 - $100", "< $10", "> $100").
  return typeof min === 'undefined'
    ? `< $${max}`
    : typeof max === 'undefined'
    ? ` > $${min}`
    : `$${min} - $${max}`;
};

export const buildFacetLabel = (selectedFacet: any, overridenLabel: string) => {
  if ('min' in selectedFacet || 'max' in selectedFacet) {
    return `${buildRangeLabel(selectedFacet.min, selectedFacet.max)}`;
  }
  return `${overridenLabel}`;
};
here i’m also passing the overridenLabel if you want to override the existing label from Sirecore CMS side. otherwise you can remove it.
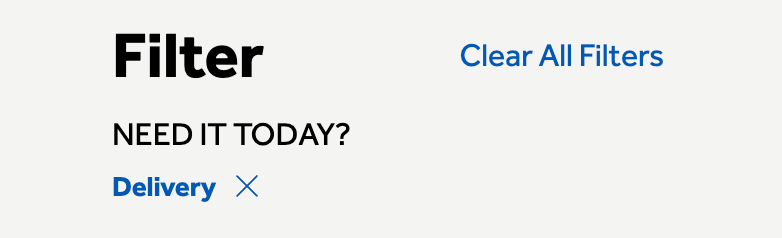
Implement a Custom Facet Header:
as I’m using separate FacetHeader component i’ll be going use buildFacetLabel for dynamic label. (which are shown as selected facet at top of the facet section)
//Implement a Custom Facet Header
function FacetHeader({ facet, actions, settings }: FacetProps) {
  const selectedFacets = useSearchResultsSelectedFacets();
  const selectedFacetIds = selectedFacets.map((x) => x.id);
  const isFacetSelected = selectedFacetIds.includes(facet.name);
  const dictionary = useDictionary();
  return (
    <AccordionFacets.Header className={'flex flex-col justify-between'}>
      <AccordionFacets.Trigger className={styles['sitecore-accordion-trigger'] + ' group'}>
        <span className={facetLabel()}>
   -->     {buildFacetLabel(selectedFacets, settings?.facetLabelOverride || facet.label)}
        </span>
        {isFacetSelected ? (
          <span
            className={clearLabel()}
            // This is a span instead of a button because we are already inside a button
            onClick={(e) => {
              e.stopPropagation();
              return actions.onRemoveFilter({ facetId: facet.name, type: 'range' });
            }}
          >
            {dictionary.getDictionaryValue('ClearFacetPLP', 'Clear')}
          </span>
        ) : null}
        <IconHelper className={facetIcon()} icon={'chevron-down'} />
      </AccordionFacets.Trigger>
    </AccordionFacets.Header>
  );
}
Final result 🥳
You can also deep dive some additional configuration ⚙️
Default facet selection
To set the selected filter on the url (so, you can use as default selected filter on page load), we can do something like:
function facetToUrl(selectedFacets: FacetValue[]) {
// Converts selected facets to a URL hash string.  Handles range facets specifically.
  if (!selectedFacets.length) {
    return '';
  }
  const facets: Record<string, string> = {};
  selectedFacets.forEach((facet) => {
    let value = facet.valueLabel ?? facet.facetValueText;
    if (facet?.type === 'range') {
      value = `${facet?.min}-${facet.max}`;
    }
    // Depending on when it's called, sometimes it comes as facet.valueLabel, other times it's facet.facetValueText
    if (!value) {
      return;
    }
    const key = FACET_PREFIX + facet.facetId;
    if (!facets[key]) {
      facets[key] = '';
    } else {
      facets[key] += '|';
    }
    facets[key] += value;
  });
  const params = new URLSearchParams(facets);

  return params.toString();
}

//Hook to keep facets synchronized with the URL.
export const useEnsureFacetUrl = (
  actions: SearchResultsWidget['ActionProps'],
  facets: SearchResponseFacet[]
) => {
  const router = useRouter();
  const selectedFacetsFromApi = useSearchResultsSelectedFilters();

  const selectedFacetsFromApiUrl = decodeURI(facetToUrl(selectedFacetsFromApi));

  const [prevFacetUrl, setPrevFacetUrl] = useState<string>();

  useEffect(() => {
    if (prevFacetUrl === undefined) {
      setPrevFacetUrl(router.asPath.split('#')[1] ?? '');
    } else {
      if (prevFacetUrl !== selectedFacetsFromApiUrl) {
        setPrevFacetUrl(selectedFacetsFromApiUrl);
        router.push(
          {
            pathname: window.location.pathname,
            // window.location.search includes the '?' if there is a querystring.
            // This caused extra '?' to be added each time.
            // If there is no querystring, there is no '?' so this issue wasn't caught earlier.
            query: window.location.search.replace(/^\\?/, ''),
            hash: selectedFacetsFromApiUrl,
          },
          undefined,
          { scroll: false }
        );
      }
    }
  }, [actions, facets, prevFacetUrl, router, selectedFacetsFromApiUrl]);
};
final step for set up the selected facet in url is using this hook inside your search component
// In your search component:
// To ensure that facets are synced with the URL:
  useEnsureFacetUrl(actions, facets);
to use as default selection you need one more configuration to convert url to facet value
export function urlToFacet(hash: string) {
  const query = new URLSearchParams('?' + hash);

  const facets: FacetValue[] = [];

  for (const [key, value] of query.entries()) {
    if (!key.startsWith(FACET_PREFIX)) {
      continue;
    }
    const facetId = key.split(FACET_PREFIX)[1];
    const valueArray = value.split('|');
    valueArray.forEach((x) => {
      if (facetId == filterByPrice.partyPrice) {
        const minMax = x?.split('-');
        facets.push({ facetId, min: Number(minMax[0]), max: Number(minMax[1]) });
      } else {
        facets.push({ facetId, facetValueText: x });
      }
    });
  }
  return facets;
}
use use it you can call it from useSearchResults in state config as selectedFacets
 state: () => {
      const hasWindow = typeof window !== 'undefined';
      const hash = hasWindow ? window.location.hash.replace(/^#+/, '') : '';
      const facetsFromUrl = urlToFacet(hash); // Get selected facets from the URL.
      return {
        selectedFacets: facetsFromUrl, //Set these as the initial selected facets.
      };
    },
Conclusion
With this implementation, you’ll have a fully functional range facet in your Sitecore Search-powered Next.js application. The range facet supports:
Dynamic min/max values
Visual range slider
URL synchronization
Clear formatting of selected ranges
Proper integration with existing facet infrastructure
This guide explains how to implement and customize 404 error pages in a Sitecore JSS Next.js multisite environment. We’ll cover both the Sitecore configuration and the Next.js implementation.
Sitecore Configuration
1. Create the 404 Page
First, create a custom 404 page in Sitecore Content Editor:
Navigate to the page section in Content Editor
Create a new page named _404 (Note: Avoid using “404” as the page name per Sitecore JSS guidelines)
Set the display name to “404”
Add desired components to the page
2. Configure Error Handling
Configure your site to use the new 404 page:
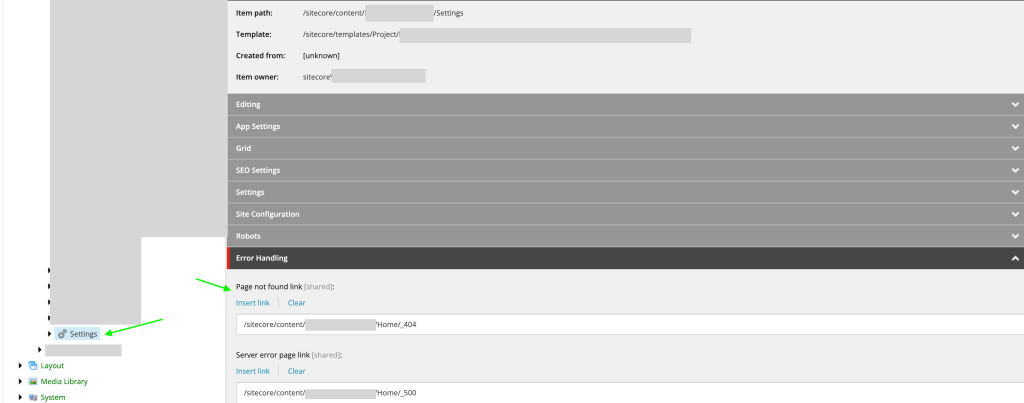
Navigate to your site’s Settings node
Scroll to the Error Handling section
Set the “Page not found” link to your newly created 404 page
Publish all changes
Next.js Implementation
Basic 404 Page Setup
Create a 404.tsx file in your Next.js app’s pages directory:
Create a NotFound.tsx component for cases where layout data is unavailable:
import Head from 'next/head';

const NotFound = (): JSX.Element => (
  <>
    <Head>
      <title>404: NotFound</title>
    </Head>
    <div style={{ padding: 10 }}>
      <h1>Page not found</h1>
      <p>This page does not exist.</p>
      <a aria-label="Go to the Home page" href="/">
        Go to the Home page
      </a>
    </div>
  </>
);

export default NotFound;
Multisite Configuration
1. Create API Route for Error Pages
Create pages/api/error/content.ts to handle multisite 404 content:
import {
  ComponentPropsService,
  GraphQLErrorPagesService,
  LayoutServiceData,
} from '@sitecore-jss/sitecore-jss-nextjs';
import { siteResolver } from 'lib/site-resolver';
import { NextApiRequest, NextApiResponse } from 'next';
import config from 'temp/config';
import clientFactory from 'lib/graphql-client-factory';
import { moduleFactory } from 'temp/componentBuilder';

export default async function handler(req: NextApiRequest, res: NextApiResponse) {
  // Get site name based on domain
  const domain = req.headers.host;
  let siteName = config.sitecoreSiteName;

  try {
    const site = siteResolver.getByHost(domain ?? '');
    siteName = site.name;
  } catch (error) {
    // Fallback to default site name
  }

  const errorPagesService = new GraphQLErrorPagesService({
    clientFactory,
    siteName,
    language: (req.headers.locale as string) ?? config.defaultLanguage,
    retries: parseInt(process.env.GRAPH_QL_SERVICE_RETRIES ?? '0', 10),
  });

  try {
    // Fetch error pages content
    const resultErrorPages = await errorPagesService.fetchErrorPages();

    // Fetch component props
    const context = {
      defaultLocale: 'en',
      locale: 'en',
      locales: ['en'],
    };

    const layoutService = await new ComponentPropsService().fetchStaticComponentProps({
      context,
      layoutData: resultErrorPages?.notFoundPage?.rendered as LayoutServiceData,
      moduleFactory,
    });

    // Set cache headers
    res.setHeader('CDN-Cache-Control', `s-maxage=60, stale-while-revalidate=${60 * 60}`);
    res.setHeader('Cache-Control', `max-age=60, stale-while-revalidate=${60 * 60}`);

    res.status(200).json({ ...resultErrorPages, componentProps: layoutService });
  } catch (error) {
    console.error('Error fetching error pages:', error);
    res.status(500).json({ message: 'An error occurred' });
  }
}
2. Update 404 Page for Multisite Support
Modify your 404.tsx to use the new API endpoint:
import {
  ComponentPropsCollection,
  ComponentPropsContext,
  ErrorPages,
  LayoutServiceData,
  SitecoreContext,
} from '@sitecore-jss/sitecore-jss-nextjs';
import { componentBuilder } from 'temp/componentBuilder';
import Layout from 'src/Layout';
import { useEffect, useState } from 'react';
import NotFound from 'src/NotFound';
import { SitecorePageProps } from 'lib/page-props';
import { ComponentProps } from '@sitecore-feaas/clientside';

type PageProps = SitecorePageProps & {
  data: ComponentPropsCollection;
};

const Custom404: React.FC<PageProps> = () => {
  const [layoutData, setLayoutData] = useState<LayoutServiceData>();
  const [componentProps, setComponentProps] = useState<ComponentProps>();
  const [fetchError, setFetchError] = useState(false);

  useEffect(() => {
    if (!layoutData) {
      fetch('/api/error/content')
        .then(async (res) => {
          const data = (await res.json()) as ErrorPages | null;
          if (data?.notFoundPage.rendered) {
            setComponentProps((data as any)?.componentProps);
            setLayoutData(data?.notFoundPage.rendered);
          } else {
            setFetchError(true);
          }
        })
        .catch(() => {
          setFetchError(true);
        });
    }
  }, []);

  if (fetchError) {
    return <NotFound />;
  }

  if (!layoutData || !componentProps) {
    return <></>;
  }

  return (
    <ComponentPropsContext value={componentProps}>
      <SitecoreContext
        componentFactory={componentBuilder.getComponentFactory()}
        layoutData={layoutData}
      >
        <Layout layoutData={layoutData} headLinks={[]} />
      </SitecoreContext>
    </ComponentPropsContext>
  );
};

export default Custom404;
Important Notes
The DISABLE_SSG_FETCH environment variable must be unset or false for local development to fetch static pages. (when you fetch data using getStaticProps)
The multisite implementation uses an API route instead of getStaticProps to fetch layout data based on the hostname.
Cache headers are implemented for browser optimization.
A fallback static NotFound component is provided for cases where the layout data cannot be fetched.
Make sure to publish all Sitecore changes after configuration.
Troubleshooting
If the 404 page isn’t appearing, verify that:
The page is published in Sitecore
The Error Handling settings are correctly configured
The DISABLE_SSG_FETCH environment variable is not set to true (when you fetch data using getStaticProps).
The API route is returning the correct data for your hostname
In this blog, you’ll take your first step with OrderCloud. You’ll learn some basics and see a demo on how to create your very first app using OrderCloud. So, let’s dive deep and explore the treasures of OrderCloud! 🪜 This is your first step towards mastering OrderCloud.
I’ll guide you through the essential concepts needed to create and connect your first OrderCloud app with Next.js. Let’s get started! 🏃🏻♂️
Creating Your First Marketplace
What is a Marketplace?
In the context of commerce, a marketplace is your central hub for managing everything—sellers, buyers, admins, products, and more.
Login/Sign-up in OrderCloud 🔑
You can create a free OrderCloud account and use the sandbox environment.
If you already have an account, log in with your credentials. Otherwise, register yourself by clicking here.
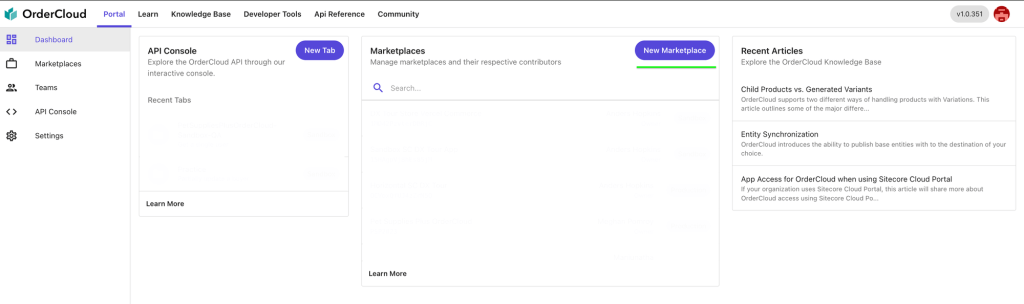
After a successful registration, you will be redirected to the OrderCloud Portal and see the OrderCloud Dashboard. Here, you can find previously created marketplaces and create a new one.
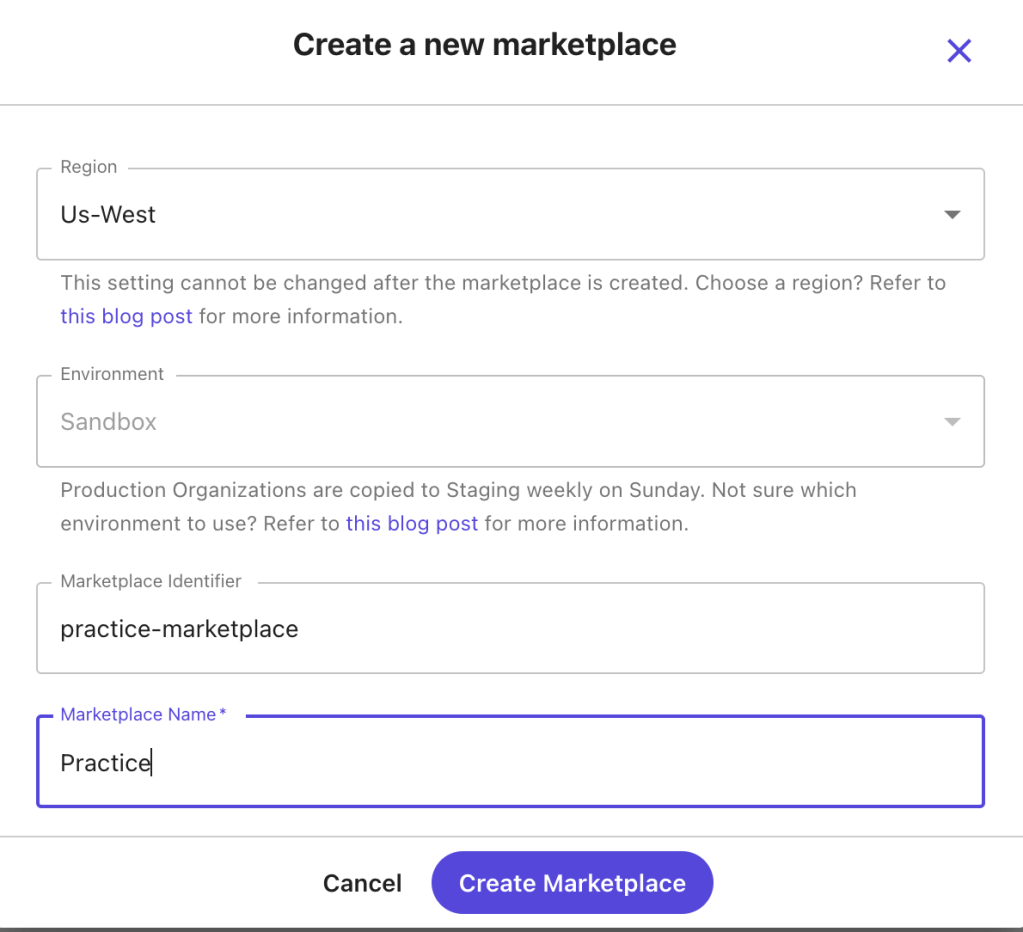
Click on the “New Marketplace” button to open the creation screen where you’ll provide essential information such as:
Region
Environment
Marketplace Identifier
Marketplace Name
After filling in the details, click “Create Marketplace”. Your first marketplace is now successfully created, showing necessary information and an option to delete the marketplace.
Next, you will learn about other aspects of OrderCloud, such as security profiles, API clients, buyers, and users.
Security Profile 🔐
Security profiles are collections of roles, each containing specific permissions that control access to various parts of an application. Think of them as predefined sets of keys, each unlocking different doors.
Creating a Security Profile
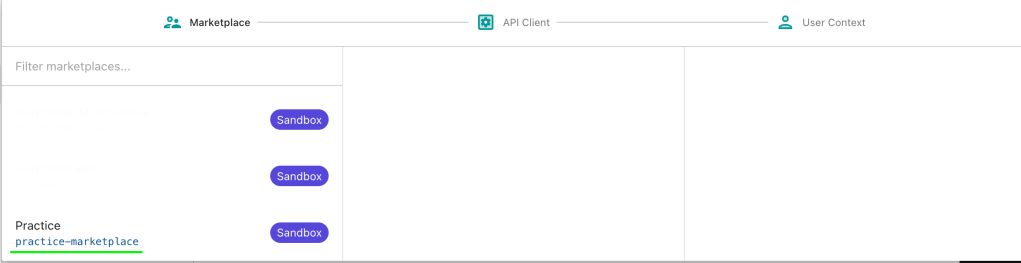
In the sidebar, find the “API Console” menu where you can interact with OrderCloud.
First, select a context (Marketplace). Choose the practice marketplace we created earlier.
Select the “Security Profile” option.
Click “Create New Security Profile”.
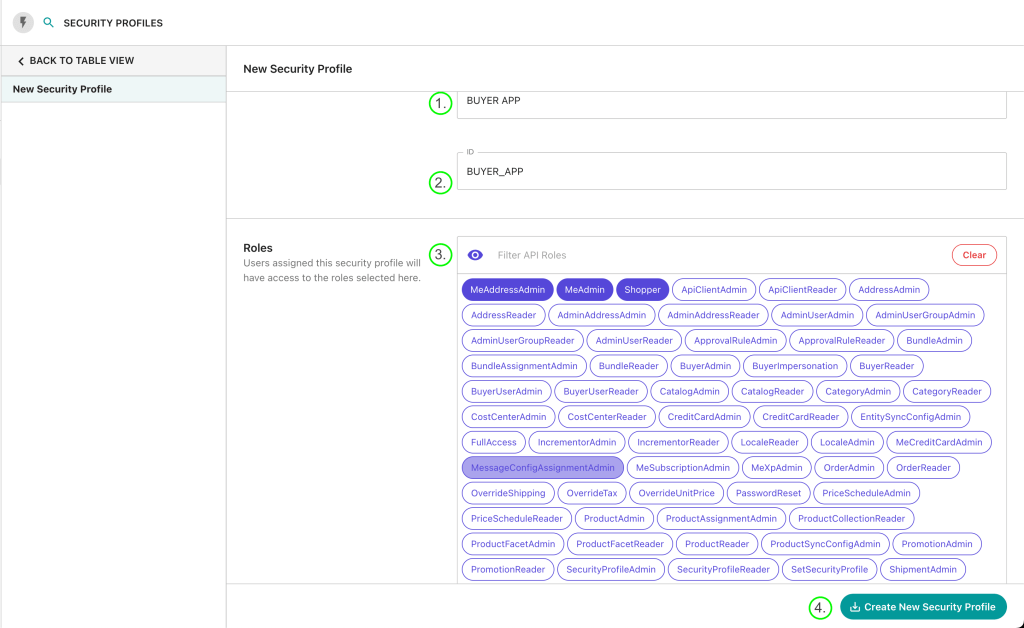
Here, we’ll create a security profile for buyers and assign specific roles, such as accessing the commerce app, creating user profiles, and viewing product lists and details.
Name: Provide a name for your security profile (e.g., BUYER APP).
ID: Provide a unique ID for your security profile.
Assign the necessary roles for a buyer user and click “Create New Security Profile”. I’ve assigned three roles which are essential for a buyer.
API Client
API Clients are unique gateways to your marketplace’s data. They control how different parties (like customers, admins, or suppliers) interact with your data. Each API Client has specific rules and permissions determining who can access what information and how.
Creating an API Client
Let’s create an API Client to access our OrderCloud app.
Go to the “API Client” menu and create a new API Client.
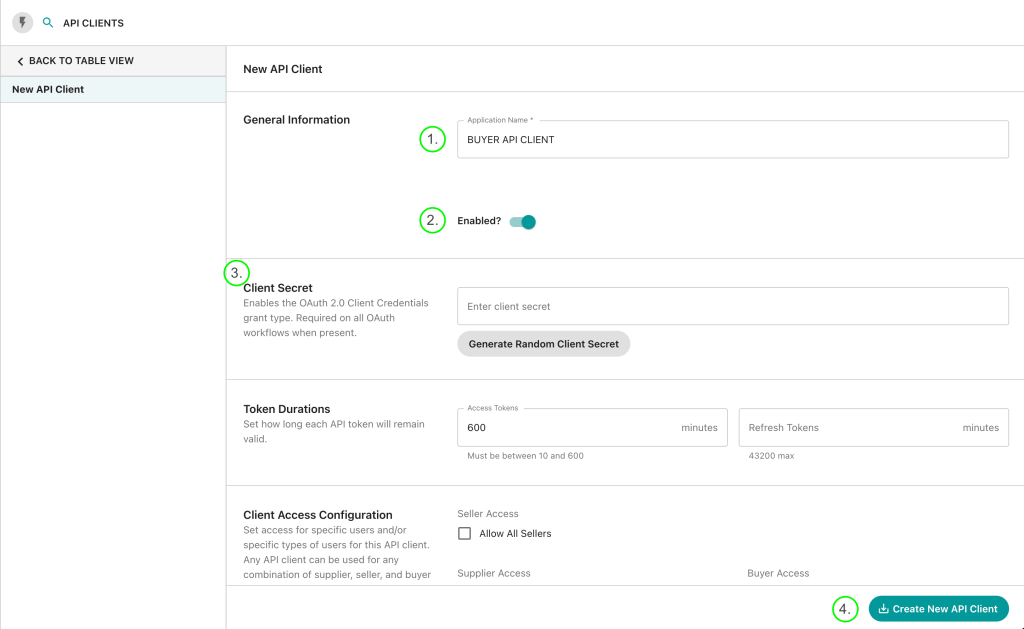
Provide the following information:
Name: Provide a name (e.g., BUYER API CLIENT).
Enabled: Set to True (default is True, can be disabled for specific purposes).
Client Secret (Optional): If provided, it also needs to be configured in your frontend app.
Token Duration: Set expiration times for access and refresh tokens (default: 600 minutes for access tokens and 0 for refresh tokens).
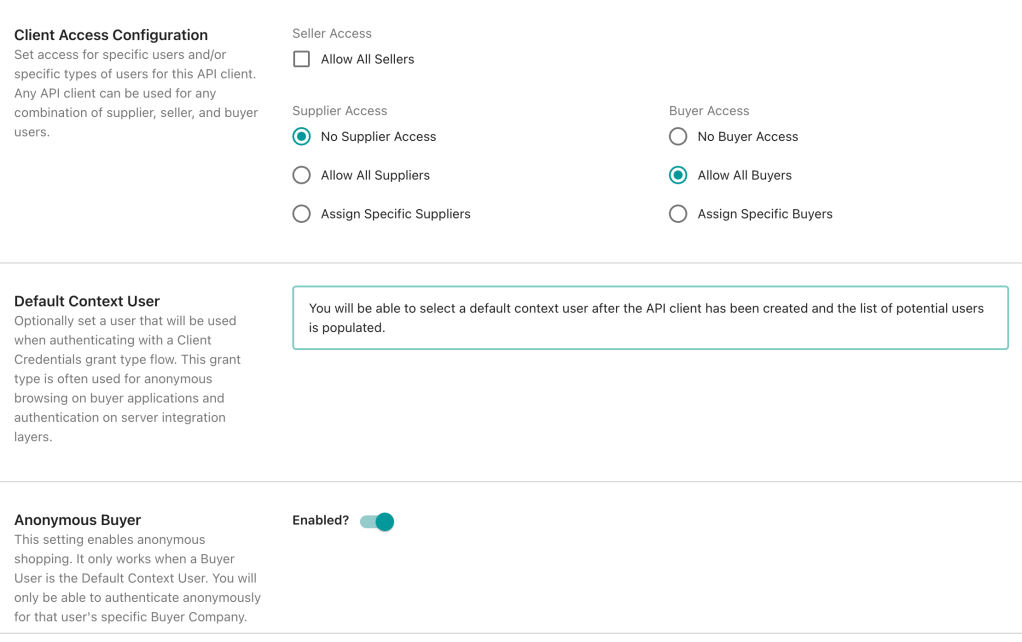
Client Access Configuration: Select client access for specific users. Here, I selected “No supplier” (no seller user can use this API Client) and “Allow All buyers” (all Buyer users can use this client ID).
Default Context User: Provide a default user (used to generate the token to access the buyer app) which we will create next.
Anonymous Buyer: Allows anonymous buyer users.
Finally, click on the “Create New API Client” button.
Creating a Buyer and Their User
Buyers
A user group under which you can create users who can access an application. For example, we are end users for companies like Amazon, Flipkart, Myntra, etc. Here, this is a user group for all buyer users, meaning if we assign a security profile to this buyer group, all users created under it will automatically get their roles.
Creating a Buyer Group
To create a Buyer Group:
Navigate to the “Buyer” menu in the sidebar.
Select an option from the API request.
Provide the following information:
ID: Provide a unique ID (e.g., BUYER GROUP).
Active: Set to true (default is false, ensure it’s true to access the end-user app).
Name: Provide a respective name and hit the send button.
You have successfully created a Buyer Group. Now, let’s move to the next step: creating a user for our app.
Assigning a Security Profile to Buyer Group
Assign a Security Profile to the Buyer Group, meaning users created under this group will automatically receive the roles specified in the BUYER APP Security Profile.
Go to the Security Profile and then select the below request
Then Assign BUYER_APP Security profile to the BUYER_GROUP API Client.
Creating a Buyer User
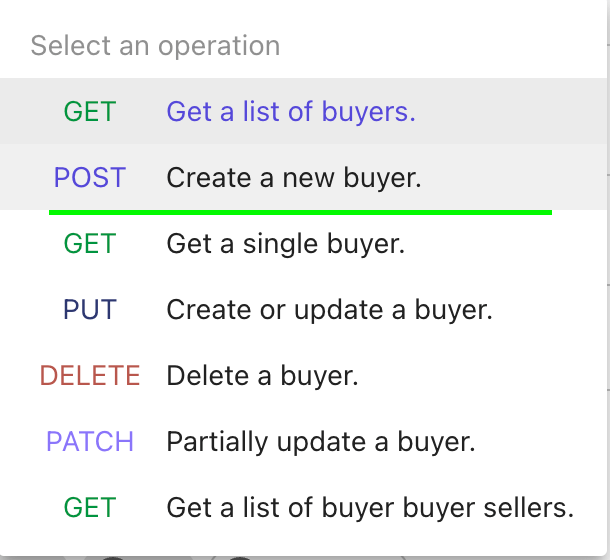
Under the Buyer menu, you can see an option to create a new buyer user.
Select a POST request to create a new user.
Provide necessary information like Name, ID, Active status, Username, Password, First Name, Last Name, Email, and Phone. There is also an Extended Properties (xp) field for additional information like user image, gender, birthdate, etc.
This user has the AvailableRoles property, provided in our security profile.
😊 Hope you’re enjoying the read. Let’s move to the next step.
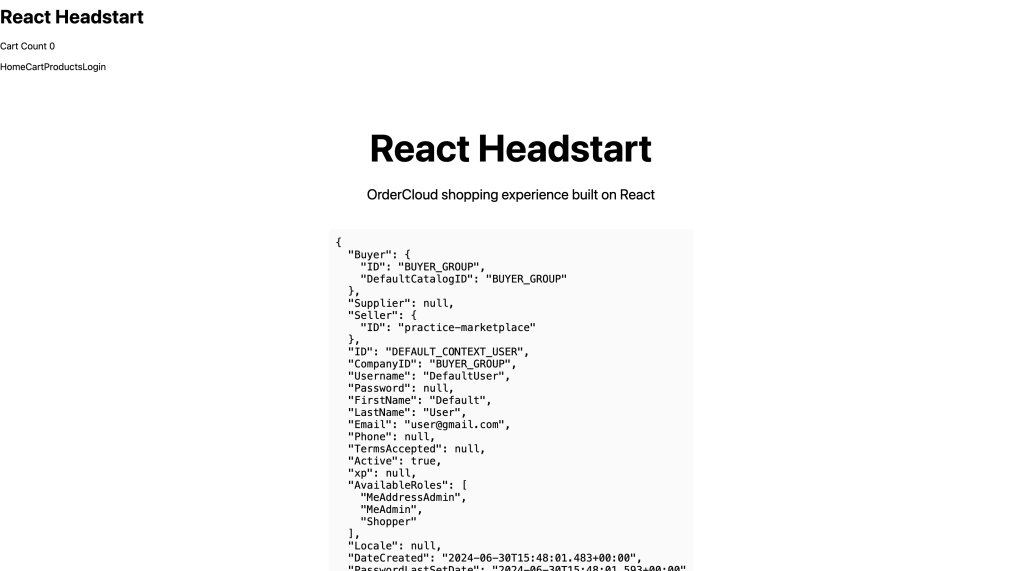
Connecting Your Next.js App with OrderCloud
OrderCloud provides a starter kit to easily create a new application. Clone it from the GitHub link.
Open the folder in your favorite IDE.
Go to your project directory.
Folder structure:
Then, Create a new .env file and paste the following variables:
Setting up Sitecore CLI is an essential step to streamline your Sitecore development workflow. Here’s a guide to configuring Sitecore CLI for your project:
1. Install .NET SDK: First, make sure you have .NET SDK version 4.8 installed on your machine to match the requirements for Sitecore 10.3. You can refer to the Sitecore Compatibility Table for Sitecore XP 9.0 and later to ensure compatibility. Sitecore Compatibility Table
2. Install Sitecore Management Services: Download and install Sitecore Management Services into your Sitecore instance.
3. Open the Command Line: Navigate to your project directory and open the Command Prompt (CMD) or your terminal.
4. Install Sitecore CLI: Run the following commands in your CMD or terminal:
5. Initialize Your Project: After installing Sitecore CLI, initiate your project with the following command within your project folder:
dotnet sitecore init
This command sets up the project configuration and creates a sitecore.json file in your project directory.
6. Configure Project Structure: In your sitecore.json file, you can specify your project’s module and plugin configurations. Customize it according to your project’s needs. Here’s a sample sitecore.json structure:
7. Create Module Folders: Organize your project by creating module folders within a “serialization” directory. Typically, you’ll have Feature, Project, and Foundation folders if you’re following the Helix architecture. Customize this structure as needed. For example, you can create a “Feature” folder and add a .module.json file inside it:
8. Connect to a Sitecore Instance: Use the following command to connect to your Sitecore instance. Replace <Sitecore identity server> and <Sitecore instance> with your actual server URLs:
In this article, we’ll walk you through the process of setting up Leprechaun in your development environment and explore how it can help you generate types for your Next.js application in a Sitecore JSS project. But before diving into the setup, let’s clarify what Leprechaun is and why it’s essential in the context of Sitecore JSS.
What is Leprechaun?
Leprechaun is a code generator specifically designed for Sitecore templates. It reads serialized YAML files from Sitecore serialized items and is a command-line tool for generating models for Sitecore JSS projects.
Why Use Leprechaun?
When you’re working with a Next.js application in Sitecore JSS, creating types or interfaces for field data can be a time-consuming task. Leprechaun streamlines this process by automatically generating the necessary TypeScript types for a particular template. This significantly reduces the effort required for setting up your Next.js application.
Prerequisites for Using Leprechaun
Before you get started with Leprechaun, you’ll need to have the following prerequisites in place:
Sitecore CLI Setup: Ensure that you have the Sitecore CLI properly configured in your environment: Sitecore CLI
Serialized Sitecore Templates: Leprechaun relies on the .yaml files generated from serialized Sitecore templates. Make sure you have these files available.
Now, let’s dive into the steps to set up Leprechaun.
Setting Up Leprechaun
Step 1 – Install Leprechaun in Your Project
To install Leprechaun in your project, follow these steps:
Open a PowerShell window in administrator mode.
Navigate to your project directory.
Run the following command:
dotnet tool install --no-cache Leprechaun.Cli
You’ll receive a success message indicating that the installation was successful. You can now invoke the tool using commands like ‘dotnet tool run leprechaun’ or ‘dotnet leprechaun.’
Step 2 – Download the Code Generator File
Download the code generator file (.csx) from the following link and save it in your project directory:
In your module.json file, provide Leprechaun configuration. Ensure that the ‘@extends’ value matches your leprechaun.config file configuration name. Here’s an example of what this configuration may look like:
{
  "namespace": "Training.jss",
  "items": {
    "includes": [
      {
        "name": "feature-templates",
        "path": "/sitecore/templates/Feature/next-jss"
      }
    ],
    }
  },
"leprechaun": {
      "configuration": {
        "@extends": "Training.jss.Base", // Same name as in your leprechaun.config file
        "@name": "Feature.feature-templates" // Define where you want to save your TypeScript file.
      }
}
Step 4 – Setup leprechaun.config File
After installing Leprechaun, you need to download or copy the code from the leprechaun.config file provided in this link. Ensure that your leprechaun.config file and your sitecore.json file are in the same level.
You’ll need to configure the ‘configurations’ node in the leprechaun.config file. Here’s what a section of that configuration might look like:
You will also find another <templatePredicate> under the <Defaultss> node that you need to comment out.
Make sure to match the ‘@extends’ value in the and in <Include node> also name should same as “name”: “feature-templates” in module.json file .module file, provide the script name you downloaded in Step 2, , the specify the output directory where your code will be saved, and use the same ‘name’ as in your .module file.
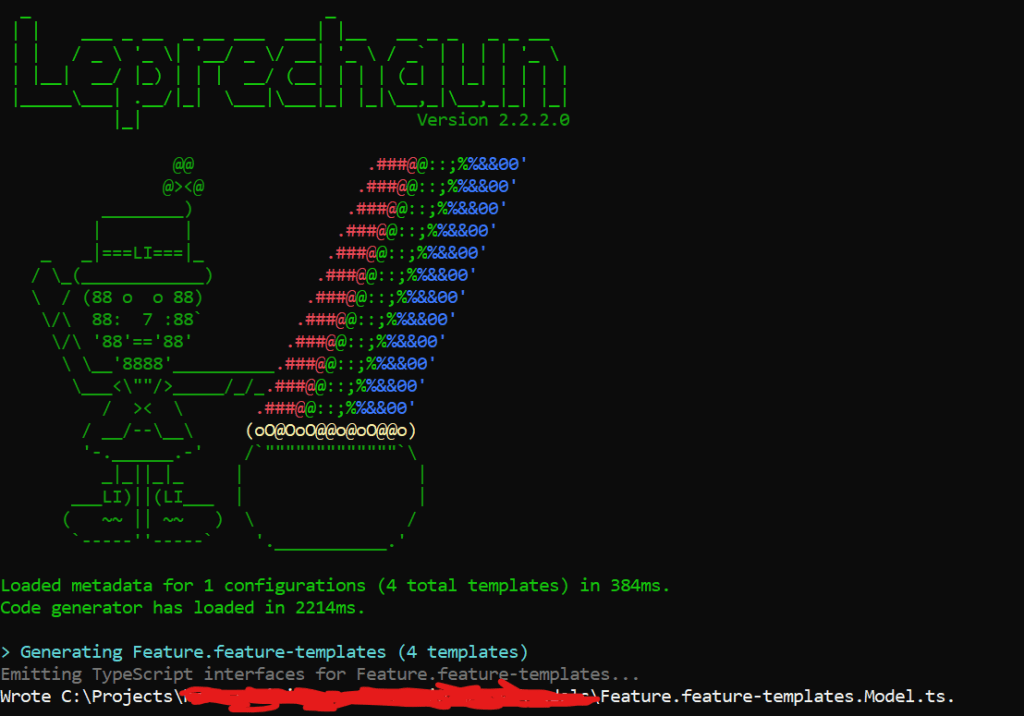
Step 5 – Run the Leprechaun Command
Finally, open your PowerShell window in administrator mode, navigate to your project directory, and run the following command:
Replace the path with the actual location of your leprechaun.config file.
Congratulations! Leprechaun is now set up and ready to generate the required code. You should see a message indicating that the code generator has loaded and successfully generated files from your templates. 🎉