Setting Up Leprechaun in Sitecore JSS 10.3
Published by Vadherravi on August 26, 2023
In this article, we’ll walk you through the process of setting up Leprechaun in your development environment and explore how it can help you generate types for your Next.js application in a Sitecore JSS project. But before diving into the setup, let’s clarify what Leprechaun is and why it’s essential in the context of Sitecore JSS.
What is Leprechaun?
Leprechaun is a code generator specifically designed for Sitecore templates. It reads serialized YAML files from Sitecore serialized items and is a command-line tool for generating models for Sitecore JSS projects.
Why Use Leprechaun?
When you’re working with a Next.js application in Sitecore JSS, creating types or interfaces for field data can be a time-consuming task. Leprechaun streamlines this process by automatically generating the necessary TypeScript types for a particular template. This significantly reduces the effort required for setting up your Next.js application.
Prerequisites for Using Leprechaun
Before you get started with Leprechaun, you’ll need to have the following prerequisites in place:
- Sitecore CLI Setup: Ensure that you have the Sitecore CLI properly configured in your environment: Sitecore CLI
- Serialized Sitecore Templates: Leprechaun relies on the .yaml files generated from serialized Sitecore templates. Make sure you have these files available.
Now, let’s dive into the steps to set up Leprechaun.
Setting Up Leprechaun
Step 1 – Install Leprechaun in Your Project
To install Leprechaun in your project, follow these steps:
- Open a PowerShell window in administrator mode.
- Navigate to your project directory.
- Run the following command:
dotnet tool install --no-cache Leprechaun.Cli
You’ll receive a success message indicating that the installation was successful. You can now invoke the tool using commands like ‘dotnet tool run leprechaun’ or ‘dotnet leprechaun.’

Step 2 – Download the Code Generator File
Download the code generator file (.csx) from the following link and save it in your project directory:
Step 3 – Configure the module.json File
In your module.json file, provide Leprechaun configuration. Ensure that the ‘@extends’ value matches your leprechaun.config file configuration name. Here’s an example of what this configuration may look like:
{
  "namespace": "Training.jss",
  "items": {
    "includes": [
      {
        "name": "feature-templates",
        "path": "/sitecore/templates/Feature/next-jss"
      }
    ],
    }
  },
"leprechaun": {
      "configuration": {
        "@extends": "Training.jss.Base", // Same name as in your leprechaun.config file
        "@name": "Feature.feature-templates" // Define where you want to save your TypeScript file.
      }
}
Step 4 – Setup leprechaun.config File
After installing Leprechaun, you need to download or copy the code from the leprechaun.config file provided in this link. Ensure that your leprechaun.config file and your sitecore.json file are in the same level.
You’ll need to configure the ‘configurations’ node in the leprechaun.config file. Here’s what a section of that configuration might look like:
<configurations import="./serialization/Feature/*.module.json">
    <configuration name="Training.jss.Base" abstract="true">
        <codeGenerator
        scripts="./CodeGen/JssTypeScript.csx"
        outputFile="$(configDirectory)\models\$(layer).$(module).Model.ts" />

        <templatePredicate type="Leprechaun.InputProviders.Sitecore.Filters.SitecoreTemplatePredicate, Leprechaun.InputProviders.Sitecore"
        rootNamespace="$(layer).$(module)" singleInstance="true">
        <include name="feature-templates" path="/sitecore/templates/Feature/next-jss"/>
        </templatePredicate>
    </configuration>
</configurations>
You will also find another <templatePredicate> under the <Defaultss> node that you need to comment out.
Make sure to match the ‘@extends’ value in the and in <Include node> also name should same as “name”: “feature-templates” in module.json file .module file, provide the script name you downloaded in Step 2, , the specify the output directory where your code will be saved, and use the same ‘name’ as in your .module file.
Step 5 – Run the Leprechaun Command
Finally, open your PowerShell window in administrator mode, navigate to your project directory, and run the following command:
dotnet leprechaun -c "C:\Demo\Demo\Leprechaun.config"
Replace the path with the actual location of your leprechaun.config file.
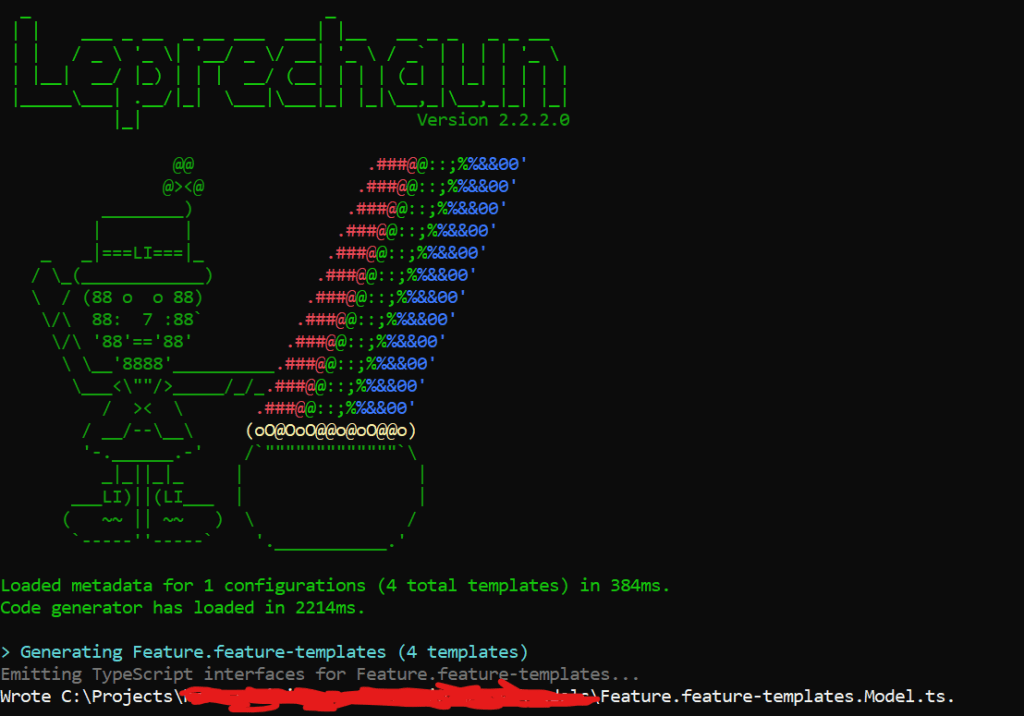
Congratulations! Leprechaun is now set up and ready to generate the required code. You should see a message indicating that the code generator has loaded and successfully generated files from your templates. 🎉


Leave a comment